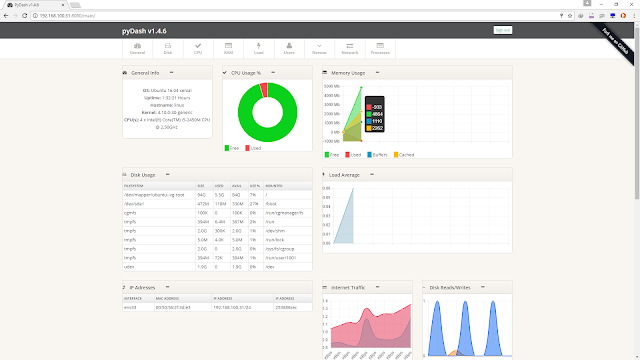
Dashboard monitoring berbasis web kecil untuk pc / server linux Anda yang ditulis dengan Python dan Django + Chart.js
PyDash dapat digunakan untuk memantau berbagai aspek server seperti CPU, RAM, statistik jaringan, pengguna online dan banyak lagi. PyDash menyediakan dashboard sederhana yang mudah dipasang dan dikonfigurasi.
INSTALLASI:
Download dan install semua dependensi yang PyDash butuhkan
--------------------------------
$ sudo apt-get install git python-pip apache2 libapache2-mod-wsgi
Reading package lists... Done
.
.
Processing triggers for ufw (0.35-0ubuntu2) ...
Clone project repository di /var/www directory
--------------------------------
$ cd /var/www
$ sudo git clone https://github.com/k3oni/pydash.git
Cloning into 'pydash'...
remote: Counting objects: 1230, done.
remote: Total 1230 (delta 0), reused 0 (delta 0), pack-reused 1230
Receiving objects: 100% (1230/1230), 1.25 MiB | 205.00 KiB/s, done.
Resolving deltas: 100% (625/625), done.
Checking connectivity... done.
Generate random key untuk PyDash configuration file
--------------------------------
@linux:/var/www$ date +%s | sha256sum | base64 | head -c 32 ; echo
ZD********************lkOTZmZGZh
$ sudo gedit pydash/pydash/settings.py

upgrade pip ke versi terakhir
--------------------------------
$pip install --upgrade pip
Aktifkan instalasi dan instal persyaratan untuk menggunakan pip
--------------------------------
$cd pydash
$sudo pip install -r requirements.txt
Jalankan script Python berikut untuk membuat database proyek dan menginstal sistem otentikasi dan membuat proyek super user.
--------------------------------
$sudo ./manage.py syncdb
Creating tables ...
Creating table auth_permission
Creating table auth_group_permissions
Creating table auth_group
Creating table auth_user_groups
Creating table auth_user_user_permissions
Creating table auth_user
Creating table django_content_type
Creating table django_session
You just installed Django's auth system, which means you don't have any superusers defined.
Would you like to create one now? (yes/no): yes
Username (leave blank to use 'root'): user
Email address: user@domain.com
Password: *****
Password (again): *******
Superuser created successfully.
Installing custom SQL ...
Installing indexes ...
Installed 0 object(s) from 0 fixture(s)
Berikan izin yang benar ke file
--------------------------------
$sudo chown -R www-data:www-data /var/www
Edit the Apache config file to match the one below
--------------------------------
$ sudo gedit /etc/apache2/sites-enabled/pydash.conf

Edit konfigurasi port Apache (/etc/apache2/sites-enabled/000-default.conf) dan ubah isi dan tambahkan baris untuk Listening pada port 8080

Buka port 8080 di firewall
--------------------------------
$sudo ufw allow 8080/tcp
Restart Apache web server
--------------------------------
$ sudo service apache2 stop
$ sudo service apache2 start
Akses Dashboar pyDash di http://ipserver:8080

Comments